Most UGC creators don’t lose brand trust because their editing is “bad.” They lose it because the raw footage was never clean enough to become a strong ad in the first place.
It’s the classic beginner mindset: “It’s fine… I’ll fix it in editing.”
But when a clip feels slightly off, awkward pacing, messy background, soft focus, weird glare, editing turns into damage control. And damage control usually looks like… an ad that doesn’t convert.
The goal of UGC ads is simple: believable, clear, and easy to watch. Not over-produced. Not cinematic. Just the kind of content that feels real, holds attention, and makes the product understandable in a few seconds.
In this guide, you’ll learn the most common UGC filming mistakes that ruin ads, plus quick fixes you can apply immediately, no fancy gear, no studio setup, and no “pro creator” budget required.
Mistake #1 — Hoping editing will save a bad clip
This is the biggest beginner trap in UGC.
You film something that’s almost good, you notice something feels slightly off… and you keep going anyway because you tell yourself:
“I’ll fix it in editing.”
The problem is: editing can polish a good clip, but it can’t replace things like natural delivery, clean framing, or a shot that actually looks right. When the footage is off, you end up spending time trying to “save” it, cutting around awkward moments, hiding mistakes with B-roll, adding extra captions, until the ad feels choppy and overworked.
Here’s the rule that saves hours:
If it feels even slightly off, reshoot immediately.
It feels like you’re wasting time in the moment, but it’s the opposite. A quick reshoot usually takes 30 seconds. Trying to rescue a weak clip can take 30 minutes… and still look mediocre.
Fix (simple habit):
Before you move on, watch the last 3–5 seconds. If you notice awkward pacing, weird lighting, unclear audio, or a “meh” delivery, redo it right there while the setup is still perfect.
Mistake #2 — Dirty lens + wrong settings (instant “low quality”)
You can have decent lighting and still look low-quality if your phone lens is dirty.
That soft haze, weird glow, or “why does this look cheap?” effect is often not your camera. It’s fingerprints, dust, or makeup smudges on the lens. And the worst part? You usually don’t notice it until you’re already editing.
Fix: make lens cleaning part of your routine. One quick wipe before every shoot is enough. (A clean microfiber cloth is ideal, but even a soft shirt is better than nothing.)

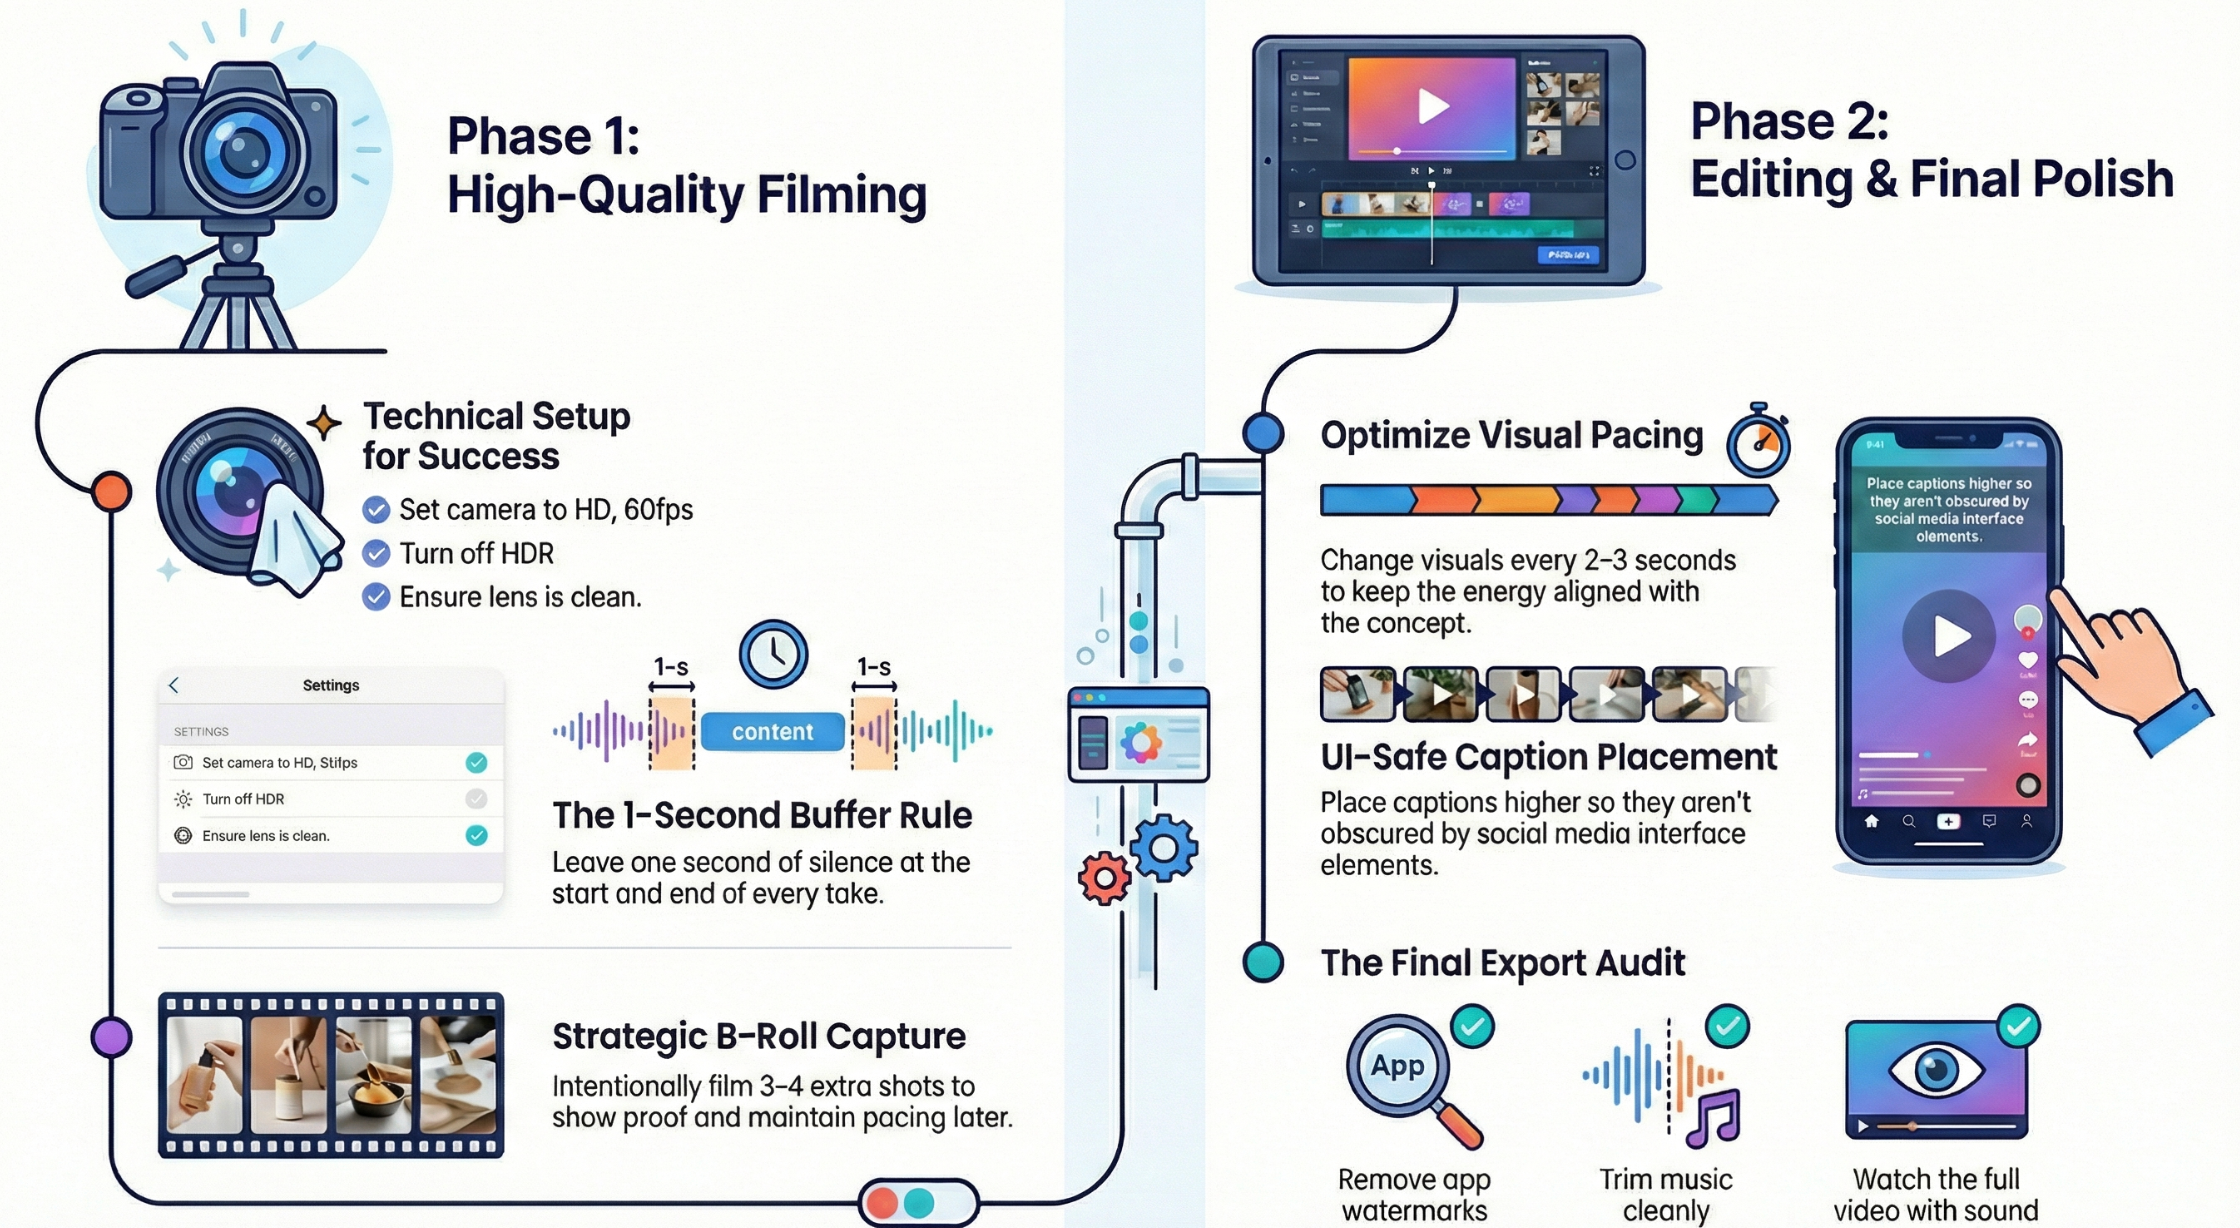
The settings rule that makes UGC look instantly better
Most UGC ads don’t need fancy camera setups. They need consistent, clean footage that edits smoothly.
A simple baseline:
- HD
- 60fps
- HDR off
Why avoid HDR? Because HDR can mess with color, skin tone, and contrast in a way that’s hard to control later, especially once the footage gets compressed for ads.
Quick test: record a 3-second clip with HDR on, then off, and compare in normal indoor light. Pick the version that looks more natural and consistent.
Mistake #3 — Ignoring the background
Most creators focus on their face, the product, and the script… and forget the background is also part of the ad.
In photos, you can sometimes crop or blur your way out of a messy scene. In video, it’s much harder. If there’s clutter behind you, a bright window blowing out the shot, a laundry pile, a random chair, or anything that feels “off,” it quietly kills trust and pulls attention away from the product.
The bigger issue: the background also signals a vibe. A clean, calm background can make even simple UGC feel premium. A chaotic background can make the same content feel cheap, even if your delivery is good.
Fix: do a 10-second “background scan” before every take. Look at your frame like a stranger would:
- Is anything distracting or messy?
- Does the space match the brand vibe?
- Is there anything bright pulling attention (windows, lamps, reflections)?

Then remove the one or two things that break the shot. That tiny reset can upgrade your footage more than any transition ever will.
Mistake #4 — Not filming enough B-roll
If you’ve ever reached the edit and thought, “I just need one more shot to make this work,” you already know the problem.
Most UGC creators only film what they planned. Then in editing, they realize they need extra clips to cover cuts, show proof, or keep the ad moving. Without B-roll, the video feels like one long talking shot, and it’s harder to make it look “ad-ready.”
The fix is simple:
Film extra B-roll on purpose. Every time.
Not “if you have time.” Not “only if the script needs it.” Just build the habit.
A good rule: record 3–4 extra B-roll shots per video, even if you think you won’t use them. Because you will.
Examples of “always useful” B-roll:
- hands holding the product
- opening the box / using it
- close-up of texture/details
- quick routine shot (pouring, applying, tapping, scrolling, unboxing)
Fix (simple habit):
After you finish your main take, don’t stop. Film four quick shots: wide, close, action, and result. That tiny extra minute makes the edit smoother and the ad more believable.
Mistake #5 — No A-roll / B-roll structure (boring, low retention)
A lot of UGC ads fail for one simple reason: they look like one long talking clip. Even if the message is good, viewers get bored fast.
Here’s the simplest way to think about it:
A-roll is your main storyline (you talking, the testimonial, the key message).
B-roll is the supporting visuals (product shots, close-ups, using it, results, context).
When you combine them, the ad feels clearer and more believable, because people aren’t just hearing claims, they’re seeing proof.
The retention rule that changes everything
A practical rule for UGC ads:
Change what the viewer sees every 2–3 seconds.
That doesn’t mean flashy transitions. It can be as simple as cutting from your face to:
- your hands using the product
- the product close-up
- the result shot
- the routine moment (kitchen, bathroom, desk)
Fix: outline your video in two layers. Write your A-roll (what you say), then plan where B-roll can cover the boring parts or add proof. Even basic cutaways instantly make your UGC feel more premium, without over-editing.
Mistake #6 — Restarting every time you mess up
This one sounds small, but it creates a lot of “amateur” looking UGC.
Many creators stop recording the moment they miss a word or say a line wrong. Then they restart from the top. The result is usually:
- choppy jump cuts
- different posture and hand positions
- inconsistent energy from take to take
- more editing work than necessary
Fix: keep the camera rolling.
If you mess up, do this instead:
- pause for a beat
- repeat the sentence from the beginning
- keep going
That gives you clean audio and clean cut points. In editing, you just cut out the mistake and stitch the good takes together. The pacing stays smooth, and the video feels more natural.
Pro tip: leave a half-second pause before repeating the line. That tiny gap makes it easier to find the edit point later.
Mistake #7 — Cutting too tight (no breathing room)
A lot of UGC ads feel rushed for one reason: there’s no buffer at the start or end of clips.
Creators hit record and start talking instantly. Then they stop the moment they finish the last word. In editing, that forces you into hard cuts that feel sharp, abrupt, and slightly stressful to watch.
Fix: give yourself “editing handles.”
A simple habit:
- Record 1 second before you speak
- Record 1 second after you finish
At the end, hold your position (or smile naturally) for a beat. That tiny extra time gives you flexibility to fade, cut cleanly, or add B-roll without making the edit feel jumpy.
This is one of those micro-details that instantly makes UGC look more professional—because the pacing feels intentional, not rushed.
Mistake #8 — Leaving “amateur signals” in the final export
Brands can usually tell in two seconds if a creator is careful or careless. And most of the time, it’s not because of your camera… it’s because of what you left in the final file.
Two common “instant amateur” signals:
- leaving the CapCut ending / template outro
- letting the music run past the end (or cut off awkwardly)
Even if the brand could fix it, they shouldn’t have to. Your final export is basically your business card. If it looks sloppy, it signals sloppy work, and brands move on to someone else.
Fix: do a 15-second export check every time.
Before you send the file, rewatch the last 3 seconds and confirm:
- no CapCut outro
- audio ends cleanly with the video
- no weird empty frames at the end
Small detail, big trust boost.
Mistake #9 — Captions not in the safe zone
Captions can make or break UGC ads. But a lot of creators place them too low, and then the platform UI covers them (buttons, captions area, “shop now,” username, etc.).
When captions get blocked, two bad things happen:
- the video becomes harder to follow (especially without sound)
- it looks careless, like you didn’t check the final delivery
Fix: keep captions in the “safe zone.”
In practice, that means placing text a bit higher than feels natural and keeping it comfortably away from the bottom edge.
Also, double-check spelling, especially brand names. One wrong letter can make the whole deliverable feel unprofessional, even if the video is great.
Quick habit: before you send the video, watch it once with your thumb covering the bottom of the screen. If you can still read everything, you’re safe.
Mistake #10 — Shooting UGC inside TikTok
TikTok is great for posting. It’s not great for filming UGC ads.
When you shoot inside TikTok, you lose control over your workflow and you often lose quality. Platforms can compress footage, and the in-app camera makes it harder to manage consistent settings, clean audio, and repeatable results, especially if you’re doing multiple takes.
For UGC ads, the clean workflow is:
Film with your normal phone camera → edit in CapCut → upload last.
That keeps your footage sharper, your edits cleaner, and your files easier to deliver to brands.
The only time filming inside TikTok makes sense is when you specifically need:
- a trend audio
- an in-app effect that’s part of the concept
But for most UGC ad work, it’s an unnecessary quality drop.
Fix: default to native camera filming. Treat TikTok as the distribution platform, not the production studio.
Final checklist (copy/paste)
UGC Filming Checklist (before you hit record)
Clean lens first.
Check your framing and your background.
Set your camera to HD and 60fps, with HDR off.
Record one “test clip” and watch it back for glare, focus, and audio.
If a take feels even slightly off, reshoot immediately.
When you mess up, don’t restart, pause, repeat the line, keep rolling.
Give yourself 1 second at the start and 1 second at the end of each take.
Film your A-roll, then grab 3–4 extra B-roll shots on purpose.
UGC Editing Checklist (during the edit)
Use B-roll to keep the pace and show proof, not to hide chaos.
Change visuals every 2–3 seconds (simple cuts are enough).
Keep the pacing aligned with the concept (calm vs high-energy).
Place captions higher so they stay readable and don’t get covered by UI.
Double-check brand names and key claims in text.
Post-production checklist (before you send to the brand)
Remove any CapCut ending / template outro.
Trim music so it ends cleanly with the video.
Watch the final export once, full screen, with sound on and off.
Check the last 3 seconds for awkward cuts or dead space.
Export in the format/resolution the brand requested.
Table of contents
- Mistake #1 — Hoping editing will save a bad clip
- Mistake #2 — Dirty lens + wrong settings (instant “low quality”)
- Mistake #3 — Ignoring the background
- Mistake #4 — Not filming enough B-roll
- Mistake #5 — No A-roll / B-roll structure (boring, low retention)
- Mistake #6 — Restarting every time you mess up
- Mistake #7 — Cutting too tight (no breathing room)
- Mistake #8 — Leaving “amateur signals” in the final export
- Mistake #9 — Captions not in the safe zone
- Mistake #10 — Shooting UGC inside TikTok
- Final checklist (copy/paste)