

UGC gets messy faster than almost any other type of content, not because you’re disorganized, but because the workflow has too many moving parts. One week you’re dealing with 3 creators and a few organic posts. The next week you’ve got 12 creators, 40 deliverables, 6 hook variations, 3 different aspect ratios, and an ads team asking for “the version without the claim” and “the one that worked best on TikTok.”
It also doesn’t live in one place. Raw footage sits in a Drive folder. Final exports are in WhatsApp, email, or WeTransfer links. Thumbnails are somewhere in Canva. Captions are in a doc. Usage rights and whitelisting approvals are buried in a thread you can’t find when you need it. And the worst part? Everything looks similar, so even if you have the file, you’re never 100% sure it’s the right version.
This guide is here to fix that without making it complicated. You’ll set up a simple system for folders, naming, tagging, and version control so you can find any UGC asset in seconds, your team (and future you) can understand it instantly, and you always know what’s approved, what’s live, and what’s safe to use for ads.
What “Organized” Actually Means for UGC Assets
When people say “we need to organize our UGC,” they usually mean “we need a folder.” But a folder isn’t a system. An organized UGC library is one where you can grab the right file fast, trust that it’s the right version, and understand what’s going on without opening 15 tabs.
Here’s the real goal, in plain language:
You can find any asset in under 30 seconds.
Not “I think it’s in this Drive somewhere.” Not “let me ask the creator again.” You search once, click once, and you’ve got the exact raw file or final export you need.
Anyone on the team can understand the structure instantly.
A good system doesn’t live in your head. If a teammate joins tomorrow (or you hand this off to an agency), they should be able to navigate it without a long explanation. The structure should feel obvious.
You can track what’s approved, what’s live, and what’s outdated.
UGC moves fast. Brands change claims, offers, and angles. An asset that was “perfect” two months ago might be unusable today. Organized means you can quickly tell what’s cleared for use, what’s currently running, and what should never be reused.
You don’t lose raw footage, licenses, or performance context.
This is the painful one. Raw footage is often the most valuable part because you can cut new hooks, new formats, and new variants later. And licenses/usage rights matter because “we have the file” doesn’t mean “we’re allowed to run it as an ad.” Performance context matters too, because the best asset isn’t the prettiest one, it’s the one that worked.
So “organized” isn’t about being neat. It’s about building a system that makes UGC easy to scale, easy to reuse, and hard to mess up.
The Core Folder System (Copy This)
UGC gets messy when every file lives in a different place: raw clips in someone’s Drive, final exports in Slack, captions in Notion, and approvals buried in email. The simplest fix is to decide one rule and stick to it:
One campaign = one home folder.
Everything related to that campaign lives inside it, from the very first brief to the final performance screenshots.
That way, you’re never hunting across tools. You just open the campaign folder and you’re “home.”
Recommended top-level folders
Here’s a clean, scalable structure you can copy as-is. It works whether you’re managing 3 creators or 30.
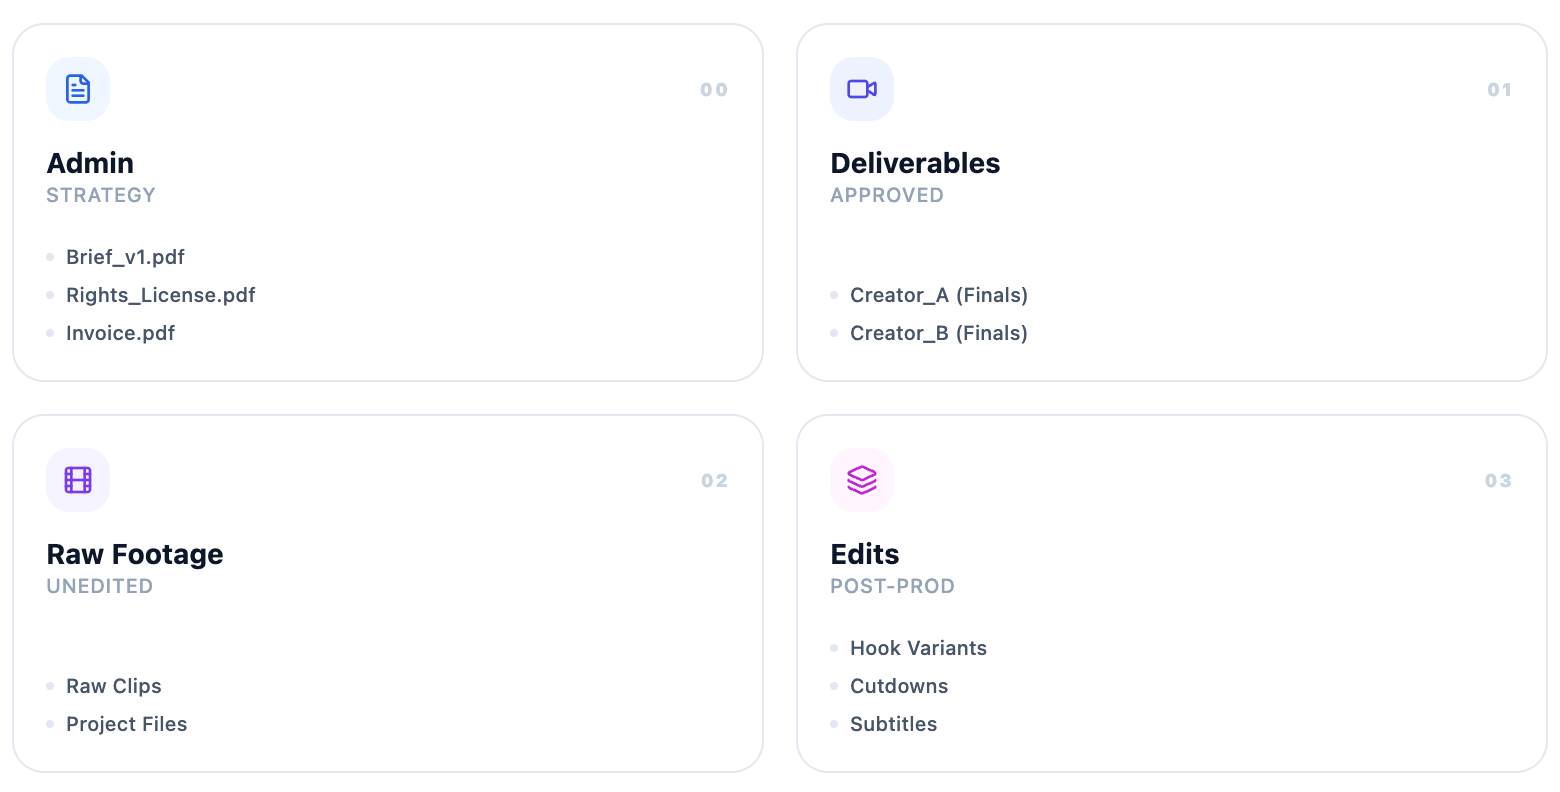
00_Admin
Briefs, contracts, usage rights/licensing notes, invoices, shipping receipts, brand guidelines, approval notes, anything “paperwork-ish” that shouldn’t be mixed with creative files.
01_Creator_Deliverables
What creators submit as “finals” (their exported videos, plus any alternate takes they sent as finished outputs). This is your “what we received” archive.
02_Raw_Footage
All raw clips, plus any project files you might need later (CapCut project, Premiere project, audio files, LUTs, etc.). If you ever want to re-edit, this is where you go.
03_Edits_And_Versions
Your internal work: trims, hook variations, platform-specific edits, different CTAs, shorter cuts, new subtitles, and anything you change after the creator delivery.
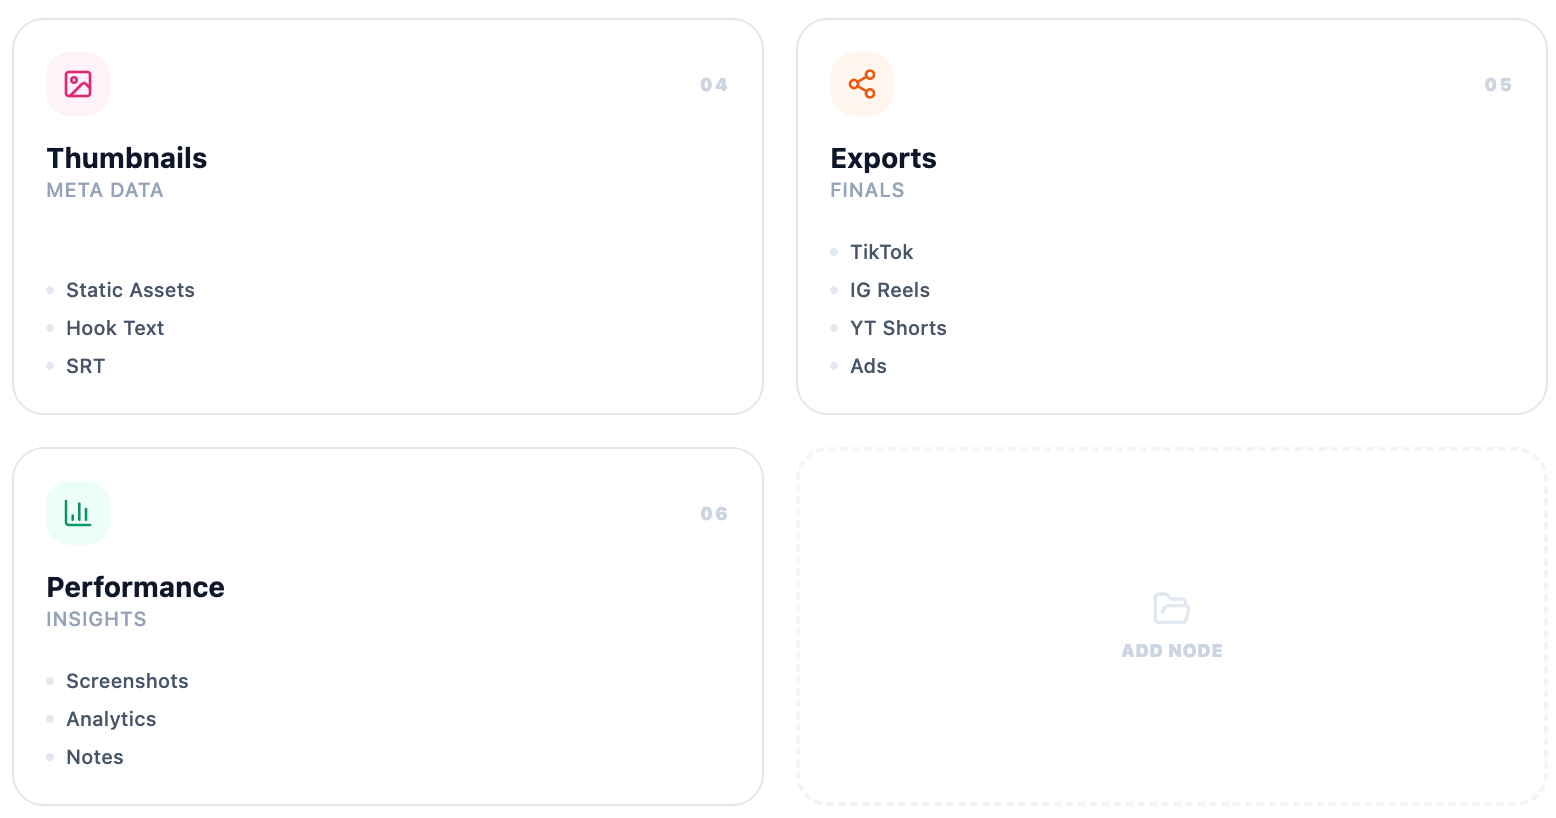
04_Thumbnails_And_Captions
Covers, caption drafts, hooks, on-screen text variations, subtitle files (SRT), and anything “packaging” related that travels with the video.
05_Platform_Exports
Final outputs by platform, ready to upload or hand off to an ads team. This prevents “Which file was the TikTok one?” confusion. It also helps when you need to re-post quickly.
06_Performance_Proof
Screenshots, reports, ad metrics exports, learnings, results, comments worth saving, and “what we’d do next time.” This folder is how you compound growth instead of restarting from scratch every campaign.
Naming Conventions That Don’t Break After 2 Weeks
Folder structure helps, but naming is what makes the system usable. When you’re juggling multiple creators, edits, platforms, and “can you export this in 9:16 and 1:1 too?”, filenames become your fastest search tool. Good naming prevents duplicates, reduces “which version is live?”, and makes collaboration easier because everyone is speaking the same language.
The goal isn’t perfection. It’s consistency. If you can look at a file name and instantly know what it is, you’re already winning.
The simple naming formula
Brand_Campaign_Creator_Platform_Concept_AspectRatio_Length_V#_Date
Use underscores so filenames stay readable everywhere (Drive, Dropbox, Finder, Windows, Slack).
Brand
The brand or client name. Keep it consistent (pick one spelling and stick to it).
Campaign
A short campaign label: product, offer, or month (ex: FebLaunch, Valentines, CopperPeptide).
Creator
Creator handle or first+last (ex: andreaK, nicolaM). Don’t mix formats.
Platform
Where this file is meant to be used: TT, IGR, YT, METAADS, UGC (generic).
Concept
A quick identifier for the idea: testimonial, problemSolution, demo, comparison, founder, or something like hookLazyInfluencers.
AspectRatio
9x16, 1x1, 16x9, this saves your life when exporting.
Length
15s, 20s, 30s, 45s. Quick clarity for paid vs organic needs.
V#
Version number: V1, V2, V3. Every meaningful change = new version.
Date
Use ISO format: 2026-01-28 so files sort correctly.
Examples (realistic)
Here are 10 examples covering the common scenarios:
Raw clip
- Clip_CreatorOnboarding_andreaK_RAWclip1_9x16_06s_V1_2026-01-28.mp4
- Clip_CreatorOnboarding_andreaK_RAWtalkinghead_9x16_18s_V1_2026-01-28.mov
Final organic
- Clip_CreatorOnboarding_andreaK_IGR_testimonial_9x16_20s_V1_2026-01-29.mp4
Paid ad version
- Clip_CreatorOnboarding_andreaK_METAADS_problemSolution_9x16_30s_V1_2026-01-29.mp4
Different hook version
- Clip_CreatorOnboarding_andreaK_METAADS_problemSolution_Hook2_9x16_30s_V2_2026-01-30.mp4
Different language version
- Clip_CreatorOnboarding_andreaK_METAADS_demo_EN_9x16_20s_V1_2026-01-29.mp4
- Clip_CreatorOnboarding_andreaK_METAADS_demo_RO_9x16_20s_V1_2026-01-29.mp4
Resized export
- Clip_CreatorOnboarding_andreaK_TT_demo_9x16_20s_V1_2026-01-29.mp4
- Clip_CreatorOnboarding_andreaK_METAADS_demo_1x1_20s_V1_2026-01-29.mp4
- Clip_CreatorOnboarding_andreaK_YT_demo_16x9_20s_V1_2026-01-29.mp4
(If you want: you can also add a status tag at the end like _APPROVED / _DRAFT / _LIVE, but only if your team will actually maintain it.)
What to avoid
The classic: final_final2_reallyfinal.mov, it tells you nothing, breaks search, and guarantees someone will upload the wrong file.
Also avoid:
- Inconsistent creator names (Andrea, andrea, andrea_k, andreak) → pick one standard.
- Missing platform → a “final” without TT / IGR / METAADS becomes useless the second you need a specific export.
- Random concept names that only make sense to one person (“new one”, “better hook”, “try this”) → keep concept labels predictable.
If you want, next we can define a simple approved vocabulary list (platform codes + concept tags) so your whole team stays consistent without thinking too hard.
Tagging System (So You Can Filter Without Opening Files)
Naming helps you identify a file. Tagging helps you find and group files fast, without opening 20 videos to remember what’s inside.
Think of tags as simple labels you attach in whatever system you use: a DAM, Google Drive (via shortcuts + consistent foldering), Airtable, Notion, Frame.io, even a spreadsheet. The point is the same: you should be able to filter down to the exact assets you need in seconds.
Example:
“Show me all approved 9:16 testimonial videos for Product A featuring a female creator with an English accent.”
That’s what tags are for.
The 4 tag categories that matter
1) Creator / Talent tags
These help you cast quickly and reuse the right faces for the right campaigns.
- Creator name / handle (single source of truth, same spelling everywhere)
- Gender (if relevant for brand fit)
- Accent / language (EN-UK, EN-US, RO, ES, etc.)
- Talent availability (pet available, child available, partner available, hands-only, voiceover-only)
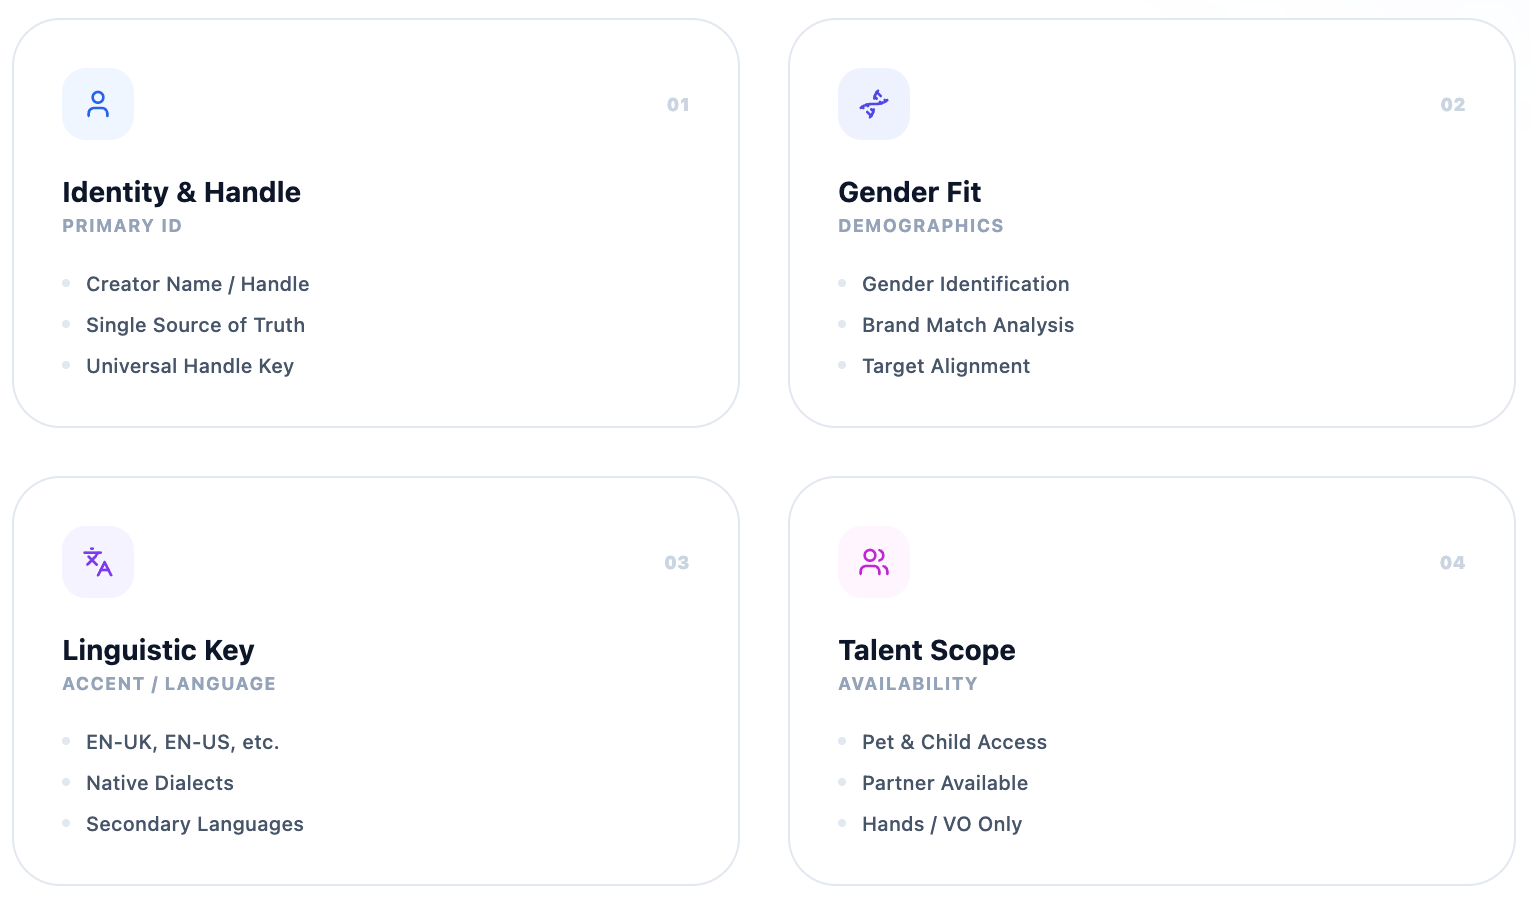
Why this matters: brands often ask for “female voiceover”, “UK accent”, “family setting”, “pet-friendly scenes”, and you don’t want to hunt manually.
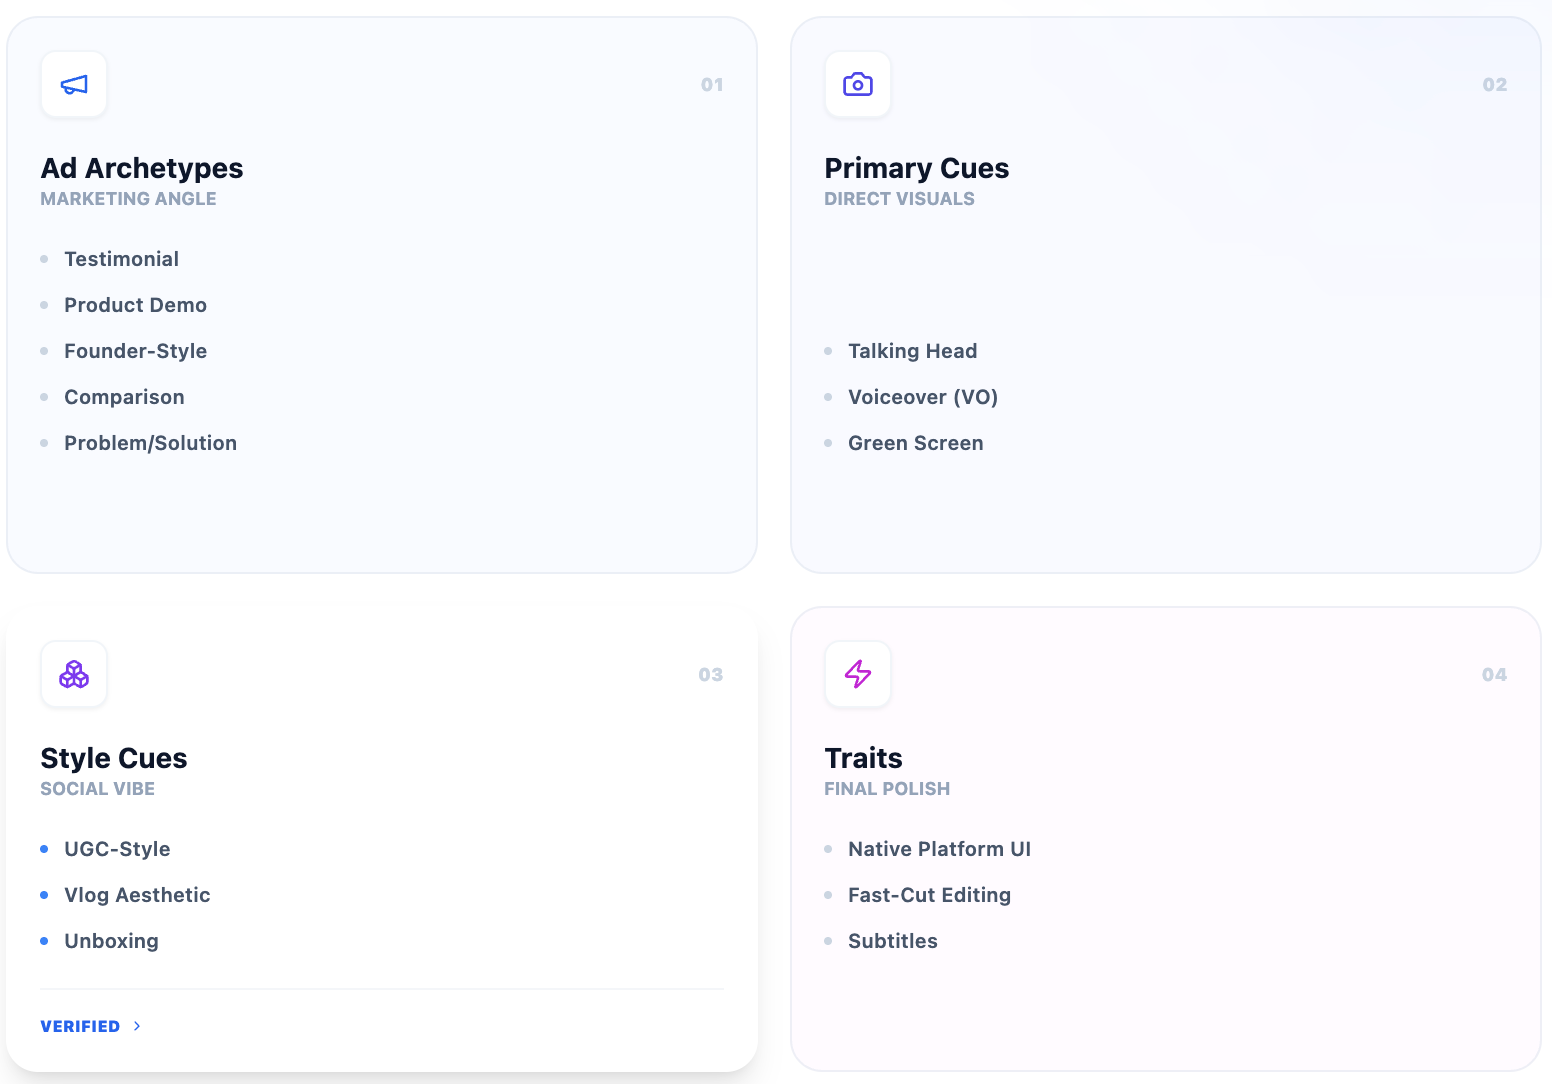
2) Creative tags
This is how you group assets by what they do.
- Ad type: testimonial, demo, founder-style, comparison, problem/solution
- (Optional but useful) Format cues: talking head, voiceover, green screen, UGC-style, vlog, unboxing
Why this matters: when performance dips, you’ll usually swap creative type first. Tagging makes it obvious what you already have.
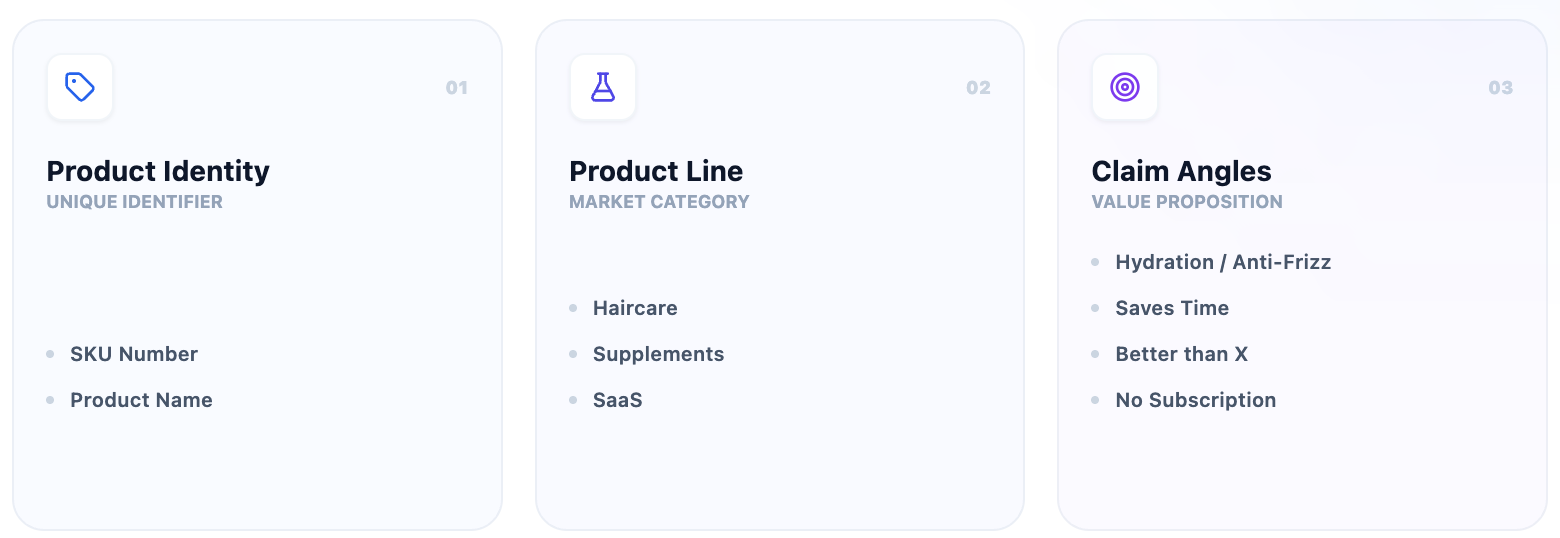
3) Product tags
This keeps content tied to what’s being sold (and prevents “we used the wrong SKU in the edit”).
- SKU or product name
- Product line (ex: “Haircare”, “Supplements”, “SaaS”)
- Claim angle (hydration, anti-frizz, “saves time”, “better than X”, “no subscription”, etc.)
Why this matters: you can quickly pull a content batch for a landing page update, a new offer, or a retargeting push for one specific product.
4) Status tags
Status tags stop chaos. Everyone knows what’s usable, what’s pending, and what should not be touched.
- draft (in progress internally)
- submitted (sent to brand / client)
- approved (greenlit; safe to publish/run)
- live (currently running/post is live)
- paused (was live, stopped)
- expired (license ended / no longer allowed / outdated)
Why this matters: the fastest way to burn time (and money) is accidentally boosting an unapproved version or using content after usage rights expire.
Optional tags for advanced teams
If you’re past the basics (or you run lots of iterations), these tags make analysis and repurposing way easier:
- Hook type (question, bold claim, pattern interrupt, POV, “here’s the truth”, shock stat)
- Offer (discount, free trial, bundle, limited-time, shipping angle)
- Objection addressed (price, trust, “does it work?”, time, complexity, safety)
- Usage scenario (morning routine, gym bag, office, travel, mom-life, before/after)
- UGC vs editorial (helps set expectations internally and for brands)
- Seasonal (Valentine’s, Black Friday, summer, back-to-school)
If you want a simple rule: start with the 4 core categories, and only add optional tags when you notice a repeated need (example: every month you ask “which hooks worked?” → add hook tags).
Version Control (So You Don’t Lose the “Right” File)
UGC goes wrong when you have three slightly different exports floating around in Slack, Drive, and email, and no one knows which one is approved, which one is live, and which one was “almost approved.”
The goal of version control is simple: one source of truth, clear version history, and zero guessing.
The “Master” rule (1 file wins)
For every asset, decide what the master is:
- MASTER = the editable project (Premiere/CapCut/AE + raw)
- EXPORT = the deliverable (MP4/MOV that gets posted or used in ads)
Your system should always make it obvious where the master lives and which export belongs to it.
A simple versioning method that works
Use V# for meaningful changes only:
- V1 = first clean cut
- V2 = changes after feedback (hook, pacing, captions, claim, CTA)
- V3 = approved version (or “candidate for approval”)
- V4+ = new variants (different hook, different offer, different language)
If it’s a tiny tweak (like volume or a spelling fix), still bump the version if it’s going to a client/brand. Otherwise you’ll lose track fast.
Separate “Creative versions” vs “Platform exports”
One of the biggest causes of confusion is mixing these:
- Creative versions = different concepts (Hook A vs Hook B, CTA soft vs CTA hard)
- Platform exports = same creative, different formatting (9:16 TikTok, 4:5 IG feed, 1:1 placements, 16:9 YouTube)
So you might have:
- ..._HookA_..._V3 and ..._HookB_..._V2 (creative versions) and each of those has:
- ..._TikTok9x16... + ..._Reels9x16... + ..._Meta4x5... (platform exports)
Use “APPROVED” the right way
Don’t mark folders “approved” unless they truly are.
Instead:
- Put approved exports into a dedicated folder: Approved_Exports/
- Or add a Status tag: approved
- Or append a clear suffix: _APPROVED (only when it’s final-final)
This prevents the classic problem: someone grabs a clean-looking V2 and assumes it’s good to run.
What to keep vs what to delete
Keep:
- Raw footage (always)
- Project files for anything that might be iterated
- Final approved exports
- Top performers + notes/screenshots of results (super valuable later)
Delete (or archive):
- Broken renders
- Old drafts that are truly useless
- Duplicate downloads of the same export (keep one source)
If you’re unsure, don’t delete, archive into an Archive/ folder so your working folders stay clean.
Quick “handoff checklist” for any version
Before you send a file to a brand (or your ads person), confirm:
- Correct platform format (9:16, 4:5, 1:1, etc.)
- Correct hook version
- Correct caption/subtitles version
- Correct claim wording (no risky promises)
- Correct CTA
- Correct status (submitted vs approved)
If you do this consistently, you stop rework before it starts.
Approval + Legal: Don’t Lose the Paper Trail
This part isn’t exciting, but it’s the difference between “we’re organized” and “we’re exposed.” UGC moves fast, and the legal/approval trail is usually the first thing that gets lost when campaigns scale.
The goal here is simple: every live asset should have a clear yes/no approval status, and a clear record of what you’re allowed to do with it.
Usage rights and duration
For each creator deliverable, you want to know:
- Where you can use it (organic only? paid only? both?)
- How long you can use it (30/60/90 days, 6 months, 12 months, perpetual)
- Where it can run (Meta only, TikTok only, worldwide vs specific regions)
If you can’t answer those questions in under 30 seconds, you’ll eventually pause a winning ad because no one is sure what’s allowed.
Paid ads and whitelisting permissions
Paid usage is not the same thing as:
- Whitelisting / Spark Ads / allowlisting (running ads through the creator’s handle)
- Raw footage rights (using clips to create new edits internally)
- Paid media “edits allowed” (changing captions, hooks, CTAs, cropping, adding overlays)
A creator might approve the post, but not approve having their handle used for ads, or not approve edits beyond the original cut. Track that clearly.
Music licensing and audio source
Audio is a silent campaign killer.
Every asset should record:
- Where the audio came from (platform audio, licensed track, custom voiceover, original sound)
- Whether it’s safe for paid usage (many “trending sounds” are fine for organic but risky for ads)
- If it’s from a library, keep the license proof / receipt / track URL
If you run paid ads, default to: original voiceover + safe licensed music unless the brand explicitly accepts the risk.
Claim substantiation
This matters most for supplements, beauty/skincare, health, finance, and “results” claims.
Keep a quick record of:
- The exact claims used (or the approved script lines)
- Any brand-provided substantiation (tests, study references, compliance notes)
- Any “do not say” list from the brand
Even if you’re not a compliance team, you want a trail showing the brand approved the messaging.
Where to store it
Keep everything inside 00_Admin/ and connect it to the asset so it’s impossible to lose.
A clean approach:
- 00_Admin/Usage_Rights_and_Legal/
- Rights_Summary_(AssetID).pdf (or a doc)
- contracts / releases
- whitelisting permission screenshots/emails
- music license proof
- claim approvals / compliance notes
Then link it to the asset ID (the same ID used in your naming + tagging system).
If someone opens the asset folder, they should immediately see: what it is, what’s approved, and what’s legally allowed.
Build an “Asset Library” That Scales
Campaign folders are great for execution, but they’re not great for reuse. After a few months, your team ends up recreating the same concepts because nobody remembers what already exists (or where it lives). That’s where an Asset Library comes in.
Think of it as your “UGC memory.” A separate master space where the goal isn’t to store everything, it’s to store what’s reusable: proven hooks, evergreen demos, strong testimonials, high-performing angles, clean b-roll, and the final exports you’ll want to pull again in 30 seconds.
The easiest rule: campaign folders are for shipping. The library is for scaling.
Two library types
You can build the library in two main ways. The best teams often do both, but start with one so it doesn’t get complicated.
1) By Brand/Product
This is the most natural structure when you manage multiple products, SKUs, or categories. It helps you instantly answer questions like:
“What UGC do we already have for Product X?” or “Do we have any strong demos for the new bundle?”
Example structure:
- Library_By_Product/
- BrandName/
- Product_Line_A/
- Product_Line_B/
- Seasonal_Offers/
- BrandName/
2) By Creative Angle (hooks, objections, proof, demos)
This structure is gold when you’re running paid ads or producing content at volume. Instead of thinking “which product?”, you think:
“What angle do we need more of?” or “We need more proof-based creatives.”
Example structure:
- Library_By_Angle/
- Hooks/
- Objections/ (price, time, trust, “does it work?”, etc.)
- Proof/ (results, reviews, before/after, stats)
- Demos/
- Founder_Style/
- Comparisons/
If you’re doing a lot of testing, this second type becomes your cheat code. You can build faster because you’re remixing what already works.
Your “best-of” folder
This is the folder that saves you when you’re under pressure.
The “best-of” folder should contain only two things:
- Top performers (ads or organic posts that proved themselves)
- Evergreen creatives (concepts that stay relevant and can be reused anytime)
Keep it small and strict. If you let it become a dump, it loses its power.
A clean structure:
- Best_Of/
- Paid_Winners/
- Organic_Winners/
- Evergreen/
- Templates_That_Work/ (your repeatable formats)
For each “best-of” asset, include a quick proof note (even a text file) or link:
- what it is (angle/hook)
- where it ran (platform)
- why it worked (one line)
- results snapshot or ad ID
The UGC Tracking Sheet (So You Know What’s Live + What Worked)
Folder structure keeps files clean. But it doesn’t tell you what’s live, what’s approved, what’s paused, and what actually performed.
That’s where a tracking sheet wins.
Because “we’ll remember which version went live” turns into:
- the wrong file getting boosted,
- duplicated work (“did we already test this hook?”),
- lost learnings (you repeat the same mistakes),
- and a team that can’t move fast without one person holding everything in their head.
A simple sheet becomes your single source of truth: what exists, where it is, what status it’s in, and what happened when it ran.
Columns to include
Here’s a clean setup that covers 90% of teams without turning into a monster spreadsheet:
- Asset ID A unique ID you use everywhere (folder name, file name, tracking sheet, approvals). Example: Clip_UGC_0241.
- File name The exact file name from your naming convention (so search is instant).
- Creator Creator name + optional notes (pet/child available, language, etc.).
- Platform (Organic/Paid) Keep it simple: Organic, Paid, or Both. You can also add channel later (TikTok/Reels/Meta).
- Ad type Testimonial / Problem-Solution / Demo / Comparison / Founder-style, etc.
- Hook angle The actual hook theme, not just “hook 1.” Examples: pain point, price objection, before/after, time saver, call-out.
- Status Your pipeline in one word: Draft, Submitted, Approved, Live, Paused, Expired, Needs Revision.
- Link to file A direct link to the asset in Drive/DAM (no hunting).
- Live URL Link to the live post or the ad preview / ad library link (whatever your team uses).
- Spend / results (optional) Optional, but powerful. Even basic fields help: Spend, CTR, CPA, ROAS, Hook rate, Hold rate.
- Notes / learnings This is the hidden gold. One line is enough:
- “Hook strong, but CTA weak”
- “Worked on TikTok, died on Reels”
- “Best comments mention X objection”
- “Version B outperformed A with same footage”
Tip: If you want this to scale without chaos, make Asset ID mandatory. Everything else can improve later.
Example Setup (3 Real Scenarios)
Scenario 1: One brand, 10 creators, 50 assets
This is the “classic chaos” setup: lots of creators, lots of files, lots of versions, and a team that needs to find things fast.
How I’d structure it:
You keep one campaign home folder, then split creator deliverables + raw + edits + exports the same way every time. The only extra rule is: inside creator deliverables and raw, you also group by creator so nothing gets mixed.
Folder example (one campaign):
- BrandX_SpringLaunch_2026/
- 00_Admin/ (briefs, rights, invoices, whitelisting approvals)
- 01_Creator_Deliverables/
- Creator_AnnaK/ (finals from Anna)
- Creator_MikeD/
- Creator_SaraP/
- 02_Raw_Footage/
- Creator_AnnaK/ (raw clips + project files)
- Creator_MikeD/
- 03_Edits_And_Versions/
- Cuts/ (V1, V2, V3)
- Hook_Variants/
- Captions_Text/
- 04_Thumbnails_And_Captions/
- 05_Platform_Exports/
- TikTok/
- Reels/
- YT_Shorts/
- Ads_Meta/
- 06_Performance_Proof/ (screenshots, reports, notes)
Tracking sheet rule: every asset gets an Asset ID and every folder/file references it. That’s what lets you locate any deliverable in under 30 seconds.
Scenario 2: One creator, multiple products
This is where things break quietly because the creator is consistent, so the team gets lazy… and suddenly Product A’s raw footage ends up inside Product B’s edit folder.
How to prevent mixing:
Use product-level separation first, then creator inside it.
Example:
- BrandX_UGC_Library/
- Product_Line_A/
- Campaigns/ (if needed)
- UGC_Assets/
- Creator_JamieR/
- 00_Admin/
- 01_Creator_Deliverables/
- 02_Raw_Footage/
- 03_Edits_And_Versions/
- 05_Platform_Exports/
- Creator_JamieR/
- Product_Line_B/
- Creator_JamieR/
- same structure
- Creator_JamieR/
- Product_Line_A/
Naming rule that saves you: always include SKU / product line in the file name (and ideally the Asset ID too). Even if someone drags the file into the wrong folder, it’s still obvious what it belongs to.
Conclusion
UGC can scale your marketing fast, but only if your files don’t turn into a mess. When you have multiple creators, constant edits, and assets going live across different platforms, “we’ll find it later” stops working really quickly.
The good news is you don’t need a complicated system. If you stick to one campaign = one home folder, use a simple naming formula, add clear status + rights tracking, and keep a best-of library for winners, you’ll save hours every week (and avoid the painful mistakes like losing raw footage or reusing expired content).
Start small, set the rules once, and stay consistent. After that, organizing UGC becomes less of a cleanup project, and more like a machine you can rely on.
Table of contents
- What “Organized” Actually Means for UGC Assets
- The Core Folder System (Copy This)
- Naming Conventions That Don’t Break After 2 Weeks
- Tagging System (So You Can Filter Without Opening Files)
- Version Control (So You Don’t Lose the “Right” File)
- Approval + Legal: Don’t Lose the Paper Trail
- Build an “Asset Library” That Scales
- The UGC Tracking Sheet (So You Know What’s Live + What Worked)
- Example Setup (3 Real Scenarios)
- Conclusion