Home UGC wins because it feels like real life. It doesn’t look like a polished commercial, it looks like someone actually using the product in their own space, like a quick recommendation you’d see from a friend. That’s exactly why it performs so well on TikTok, Reels, and paid ads: it blends in, it’s relatable, and it gets to the point fast.
It also wins because it’s fast. You don’t need a studio, a crew, or a perfect location. You need a repeatable corner of your home, a simple setup, and a process you can run again and again. When you’re creating consistently (or delivering content for brands weekly), that matters more than having “perfect” production.
But here’s the truth: most home UGC fails for the same three reasons. The lighting is bad (yellow, dark, or backlit), the audio is hard to understand (echo, noise, low volume), and the framing feels awkward (wrong angle, distracting background, product not visible). And if any of those are off, viewers swipe before your message even lands, even if your script is solid.
This guide is built to fix that. No expensive gear, no complicated setups, no “studio look” required. Just a cheap, repeatable system anyone can copy, so your videos look clean, sound clear, and feel natural, every time.
The “Home UGC” Setup Mindset (What You’re Actually Building)
Home UGC isn’t about making your apartment look like a studio. It’s about creating one reliable filming setup you can repeat without thinking.
Think of it like your “UGC corner”:
- same spot
- same light
- same framing
- same audio routine
Because once you remove the setup stress, you can focus on what actually makes videos convert: hook, clarity, energy, and showing the product well.
The goal is simple:
- Your face looks clear (no shadows, no yellow tint)
- Your voice is easy to understand (no echo, no “bathroom audio”)
- The product is visible early (not 20 seconds in)
- The background doesn’t distract (clean, but still real)
If you get those right, your videos immediately feel more “professional”… without looking overproduced.
Lighting First (Because Lighting Makes Everything Look Expensive)
Lighting is the #1 reason home UGC looks “cheap” or “high quality.” Even a perfect script can lose if the video looks dark, orange, or messy.
The best cheap lighting setup (the one most creators use)
Option A: Face a window (free)
- Stand facing the window, not sideways
- Window should be in front of you, slightly above eye level if possible
- Avoid direct sunlight on your face (it creates harsh shadows)
Option B: Ring light or soft light (budget upgrade)
- Put the light slightly above eye level, angled down
- Keep it close (closer light = softer shadows)
- Use it as your “fake window” when it’s cloudy or night
The biggest lighting mistakes (and how to fix them)
1) Light behind you (backlit silhouette)
- If the window is behind you, your face goes dark.
- Fix: turn around. Window/light in front.
2) Yellow indoor light mixing with daylight
- This is what makes skin look orange/green.
- Fix: turn off overhead lights if you’re using window light.
- If you must use indoor lights, use one consistent source.
3) Too far from the light
- Light falls off fast. Too far = shadows + noise.
- Fix: move closer to the window/light, or bring the light closer.
Audio (The Make-or-Break Part)
People will tolerate “okay” video. They won’t tolerate bad sound.
If your audio is echoey, quiet, or full of background noise, the video instantly feels low-trust, even if the lighting is good and the script is solid. Clean audio is the fastest way to make home UGC feel “paid.”
The cheapest setup that actually works
Option A: Phone mic (free, but do it right)
- Stand close to your phone (roughly arm’s length or less)
- Speak slightly louder than normal, with clear pacing
- Film in a room with “soft stuff” (curtains, couch, bed) to reduce echo
Option B: Wired lav mic (best value)
This is the most common cheap upgrade creators use because it’s simple:
- Clip mic to your shirt (around chest level)
- Hide cable if needed, but don’t stress it
- Do a 5-second test recording before filming the whole video
Option C: Wireless lav (nice upgrade if you film a lot)
This is for when you want freedom to move around (kitchen, unboxing, demos) without losing audio quality.
Quick ways to kill echo (without buying anything)
Echo usually happens in bathrooms, kitchens, and empty rooms. Fix it like this:
- Film near a couch/bed, not in the middle of the room
- Close windows if there’s traffic noise
- Put a blanket on a table just out of frame (it absorbs reflections)
- Avoid filming next to hard surfaces (tiles, bare walls, glass)
A simple rule: the more “soft” your room is, the better your audio gets.
Background noise checklist (so you don’t ruin a perfect take)
Before you press record, check:
- AC / heater off (or at least not blasting)
- Dishwasher / washing machine off
- Windows closed if you’re near cars
- Phone on Do Not Disturb (notifications ruin takes)
The easiest workflow for clean UGC audio
If you’re filming a product demo and audio is tricky (running water, noisy packaging, etc.), do this:
- Film the visuals normally
- Record a clean voiceover after (in your quiet “UGC corner”)
- Layer it on top in editing
This is how a lot of the best “natural” UGC is made, it still feels real, but it sounds clean.
Framing + Angles (So You Look Natural, Not Awkward)
Most “home UGC” doesn’t fail because the creator is bad on camera. It fails because the framing makes everything feel… off. Too low, too wide, too far away, bad eye-line, messy background, weird posture.
Good framing makes you look confident, the product look clear, and the whole video feel like something a brand can run as an ad.
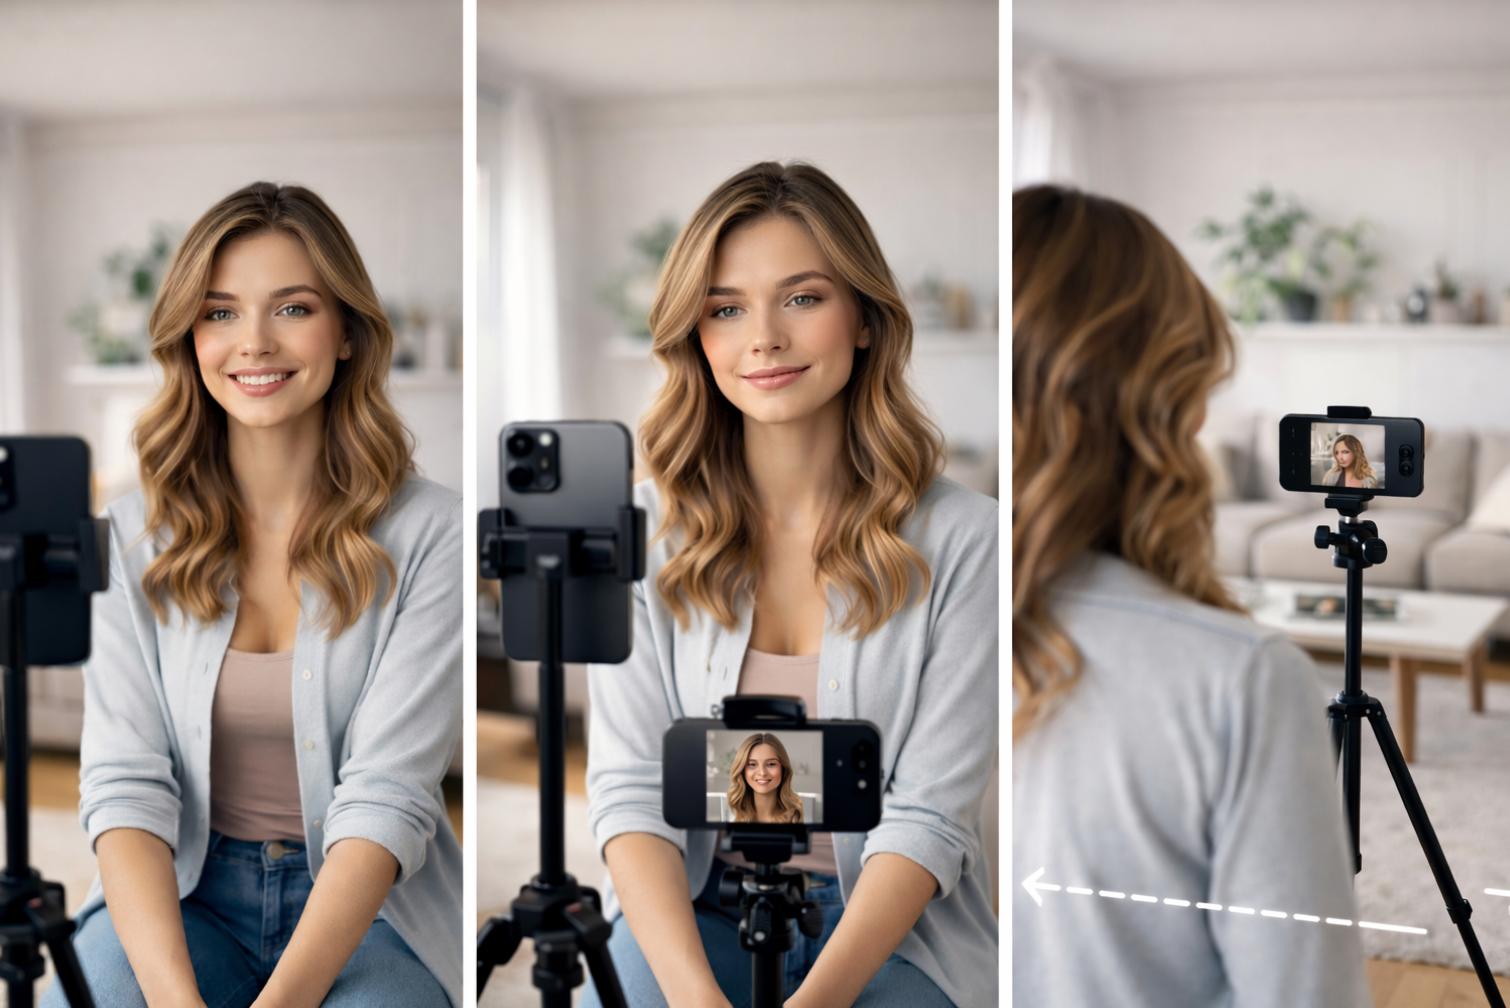
The simplest camera placement
If you remember one setup, make it this:
- Phone at eye level (not below your face)
- Camera slightly above your eye-line is even better (more flattering)
- Distance: about 1–1.5 meters away (so you’re not cramped, but still visible)
- Use the back camera if you can (better quality), but front camera is fine if lighting is good
If your phone is below your chin, you’ll look uncomfortable and the video instantly feels “amateur.”
Where to look (so you don’t seem distracted)
- Look at the camera lens, not at yourself on the screen
- If you’re reading lines: put notes close to the lens (not off to the side)
A tiny trick: move your script higher, not further. Side-eye reads like insecurity.
The “3-angle system” you can repeat for every UGC video
This is the fastest way to make your video feel dynamic without overthinking it.
Angle 1: Talking head (intro + hook)
- You on camera, chest-up framing
- This is where you deliver the problem, tension, or punchline
Angle 2: Product close-up (the “product moment”)
- Hands + product + action
- Show texture, movement, opening, applying, pouring, swiping, pressing, etc.
Angle 3: Proof / result / lifestyle
- You using it, or the “after” shot
- If there’s no visible result, show a believable proof moment (routine, convenience, reaction, before/after setup)
Even if the script is basic, switching angles like this makes the video feel “real” and watchable.
Composition tips that make you look instantly more professional
You don’t need fancy rules, just avoid the classic mistakes:
- Leave a little headroom (don’t cut your head off, don’t leave a huge gap above it)
- Keep your face in the center or slightly off-center
- Don’t film from too far away, brands want to see expression
- Keep the product in frame when you talk about it (don’t make people imagine it)
If you mention the product but it isn’t visible, your hook loses power.
Background and “home realism”
Home UGC wins because it feels real. But “real” doesn’t mean messy.
Aim for:
- Clean wall, tidy corner, simple kitchen counter, or a soft background (curtains, couch)
- No laundry piles, mirrors, personal clutter, random bottles, brand logos you don’t want in frame
A simple trick: choose one filming corner in your house and keep it “ready” so you don’t waste time resetting every shoot.
Framing for product demos (so brands can actually use the footage)
When filming the product moment:
- Get close enough that viewers can see what’s happening
- Use slower movements than you think (fast hands = unreadable footage)
- If it’s small (skincare, makeup, supplements), film over a table with good light
If you only show the product from far away, it doesn’t feel tangible, and the demo loses its job.
The “Cheap Setup” Shopping List (3 Budget Tiers)
You don’t need a studio to film good UGC at home. You need a setup that’s repeatable. The kind where you can hit record on a random Tuesday, get clean footage in 10 minutes, and not fight your camera, lighting, or sound.
At every budget tier, the goal is the same: a stable camera, flattering light, and clear audio. Most “bad UGC” isn’t bad because the creator is bad. It’s bad because the setup is inconsistent.
Tier 0 — Free setup (use what you already have)
If you have a phone and a window, you’re already 70% there. Use your phone’s back camera if you can, because it usually looks sharper and handles light better. For stability, you can prop the phone on books or anything solid so it doesn’t shake or slowly slide down during a take.
For lighting, stand near a large window and face it. That’s the simplest way to get soft, natural light without buying anything. If the shadows feel harsh on one side of your face, you can “bounce” light back by placing a white wall, a white t-shirt, or a white sheet opposite the window.
For audio, the biggest improvement is not buying gear, it’s controlling the room. Turn off fans, AC, noisy appliances, close doors, and record closer to the phone than you think you need.
Tier 1 — €20–€50 (best value upgrades)
If you want the biggest quality jump for the smallest money, prioritize two upgrades: stability and audio.
A basic tripod (or phone stand) gives your videos that instantly “clean” look. It also makes filming faster because your framing stays consistent, and you don’t have to re-shoot due to shaky footage.
Then, add a simple clip-on lav mic. Even cheap ones can make your voice sound more direct and professional, which matters a lot in UGC because people decide in seconds whether they trust you. Wired lavs are usually the cheapest and most reliable. Wireless is more flexible if you move around while filming.
If you film at night often, a small ring light or LED can help you stay consistent. You don’t want a harsh “influencer light”, just enough light to keep your face clean and your video usable when daylight isn’t available.
Tier 2 — €80–€150 (the “I want this to be solid” kit)
This tier is for creators who want a setup that works in almost any home, at almost any time of day, without fiddling.
The biggest improvement here is having two light sources (or one light plus a consistent bounce), because it gives you control over shadows. Pair that with a more reliable mic (still simple, still fast), and a clean filming corner that doesn’t distract.
Your background doesn’t need to scream “creator.” It just needs to look intentional. A neutral wall, a tidy shelf, a kitchen counter, or a plain curtain works. One small detail like a plant can add depth, but the focus should always stay on you and the product.
The simplest “buy order” if you’re on a tight budget
If you’re not sure what to buy first, start with the thing that upgrades trust the fastest: audio. Then lock your shot with a tripod. Then add a light if you need consistency at night. In most cases, that order gives you the best results without wasting money.
What usually isn’t worth it
People often buy gear that looks impressive but doesn’t get used. Wobbly cheap tripods can ruin every take. Very small weak lights don’t change much. And big “studio kits” are annoying to set up, which means you’ll avoid filming, which defeats the whole point.
The best setup is the one you’ll actually use three times a week.
Lighting That Looks Expensive (Using One Window + One Light)
Good lighting is what makes “home UGC” feel clean instead of amateur. And the funny part is: you don’t need more light, you need better placement. Most people put a light in the wrong spot, or they film with the window behind them, and the camera does the rest (badly).
Your goal is simple: even light on your face, a little depth in the background, and no weird shadows that make the video feel “off.”
The best free light setup (window-only)
Start with the window. Stand about 1–2 meters away from it and face the light. That’s it. The closer you are to the window, the softer and cleaner the light usually looks.
If your face looks half-bright and half-dark, don’t panic. That’s just “one-sided” light, and you can fix it by bouncing light back. Put something white on the darker side: a white wall, a white sheet, even a big white hoodie hung on a chair. You’re basically using it like a reflector.
Also, try to keep the background slightly darker than your face. That’s what makes you pop on camera without needing fancy gear.
The #1 rule: never put the window behind you
If the window is behind you, the phone tries to expose for the bright background and your face becomes a shadow. That’s the classic “I filmed a video but it looks like I’m in witness protection” effect.
If you really have no choice (small room, awkward layout), then at least turn your body so the window hits you from the side, and move the phone so the background isn’t a giant bright rectangle.
Add one light at night (without looking like a ring-light ad)
At night, your window is useless, so the key is making your artificial light feel soft. The easiest trick is not pointing the light directly at your face from 20 cm away. That creates harsh shadows, shiny skin, and that “creator setup” vibe.
Instead, place your light slightly above eye level, a bit off to the side, and a bit farther away. If it’s too harsh, soften it by bouncing it off a white wall, or put a thin white fabric in front of it (only if it’s an LED that doesn’t get hot). Softness matters more than brightness.
If you’re using a ring light, keep it subtle. Lower intensity, a little farther back, and don’t aim it perfectly centered like a studio headshot. You want “nice room light,” not “sponsored tutorial.”
Avoid mixed lighting (it makes skin look weird)
One of the biggest home-UGC killers is mixing warm indoor lights with cool daylight. Your camera gets confused, and skin tones can look green, orange, or grey depending on the angle.
So pick one “world” and commit to it:
- Daytime: turn off room lights and use the window.
- Nighttime: close curtains and use your lamp/ring/LED only.
This one change makes footage look instantly more professional.
The quick test before you hit record
Before filming, do a 5-second selfie video and move your head slightly left and right. If your face stays evenly lit and your eyes look bright (not shadowed), you’re in a good spot. If you see harsh shadows under your eyes or your forehead is glowing, adjust the light angle and distance instead of trying to “fix it in editing.”
Audio That Doesn’t Sound Like a Bathroom (Cheap Fixes + Mic Tips)
People will forgive “okay” video. They won’t forgive bad audio. If your voice sounds echo-y, distant, or noisy, the video instantly feels low quality, even if the lighting is great. And most home UGC audio problems come from the room, not the mic.
The goal is simple: clear voice, low echo, and consistent volume.
First fix the room (because echo is the real enemy)
If your audio sounds like you’re in a hallway, it’s usually because the room is too “hard”: bare walls, empty space, tile floors, big windows. Sound bounces around and your phone captures all of it.
The easiest fix is to film in a “soft” space:
- bedroom instead of kitchen
- curtains closed
- carpet or rug under you if possible
- a couch, bed, or clothes rack in the room helps more than you’d think
A ridiculously effective hack: stand closer to your phone and speak a little quieter. That reduces how much room echo gets captured, and it sounds more intimate (which is perfect for UGC).
Phone mic vs cheap mic: what actually matters
If you’re filming close to your phone (arm’s length) in a soft room, the phone mic is often good enough for organic UGC.
If you’re filming farther away (tripod, wider framing), you’ll usually need a mic. The easiest upgrade is a small lav mic (wired or wireless) that sits near your collar. It’s not about sounding “studio,” it’s about sounding present.
Even a cheap lav mic will beat a phone mic that’s 2 meters away.
Distance is everything
This is the rule brands don’t say out loud: the closer the mic is to your mouth, the more “professional” you sound.
If your phone is far away because you’re showing a product demo, don’t try to yell. Either:
- record a voiceover after, or
- use a lav mic so your voice stays close even when the camera isn’t
Voiceover is totally normal in UGC and often converts better anyway, because it’s calmer and clearer.
Kill background noise before you record
You don’t notice noise until you play it back. Then suddenly you hear the fridge, the traffic, the neighbor drilling into concrete, and the universe hates you.
Before recording, do a 3-second silent test. Just hit record and stay quiet. If you can hear anything annoying, move rooms or shut it down:
- close windows
- turn off fans / AC if you can
- avoid kitchens (fridge hum is brutal)
- avoid bathrooms (echo + tile = pain)
Quick voice delivery tip (makes audio feel “cleaner”)
A lot of creators speak like they’re presenting. UGC works better when it feels like a voice note to a friend.
So instead of projecting, do this:
- slow down a tiny bit
- smile slightly while speaking (it genuinely changes tone)
- keep sentences shorter (less rambling = clearer audio)
You’ll sound more confident and “natural” without doing anything fancy.
Framing That Makes You Look Confident (Angles, Distance, Background)
Once your lighting and audio are decent, framing is the thing that separates “random phone video” from “this looks like an ad that converts.”
Framing isn’t about being cinematic. It’s about making the viewer instantly understand what’s happening, who’s talking, and what they should look at.
Use the “UGC default angle” (and stop fighting it)
For most UGC, the safest angle is boring in the best way:
- camera at (or slightly above) eye level
- slight downward tilt, not upward
- you centered or slightly off-center
- your eyes in the top third of the frame
Avoid the low angle from the kitchen counter. It makes people look less confident, exaggerates the chin/jaw, and feels like a FaceTime call from 2016.
If you’re using a tripod, raise it higher than you think you need, then tilt it down slightly.
Pick your framing based on the ad type
You don’t need one framing that fits every video. You need the right framing for the job.
For testimonial / founder-style videos, go medium-close:
- head + shoulders (or chest-up)
- you’re close enough that people feel like you’re talking to them
- product can still appear in your hands without leaving the frame
For demo videos, go wider:
- show hands clearly
- show the product in use without cutting off key actions
- if your face is not needed, don’t force it (hands + voiceover often wins)
For comparison videos, stay consistent:
- same angle and distance for both “Option A vs Option B”
- it makes the comparison feel “fair” and easier to follow
Distance = trust (too far feels cold)
A common home UGC mistake is filming too wide because the creator wants the room to look aesthetic.
But viewers don’t buy rooms. They buy clarity.
If you’re speaking on camera, you usually want to be closer than you think. If your face is tiny, your emotion gets lost. And UGC is emotion + clarity.
A good test: if someone scrolls fast, can they still recognize facial expression in 1 second? If not, you’re too far.
Background should feel “real,” not distracting
Your background is part of the trust signal. But it should never compete with you.
Aim for:
- clean, not sterile
- some depth (you’re not pressed against a wall)
- no visual clutter (laundry piles kill credibility instantly)
- no bright windows behind you (they blow out the image)
If your background is messy, don’t fight it. Turn slightly and film toward a cleaner wall, a curtain, or a corner with a plant / lamp. Simple always wins.
Keep product visibility intentional (don’t hide it)
A lot of UGC videos lose the viewer because the product appears too late, or it’s tiny and hard to recognize.
In the first few seconds, try to do one of these:
- hold the product clearly in frame
- show the result first (then product)
- show the “moment of use” quickly (opening, applying, clicking, etc.)
You’re not trying to be subtle. You’re trying to reduce confusion.
Use grid lines to stop “drifting framing”
If your camera app has grid lines, turn them on. It helps you:
- keep your head level (not tilted)
- keep your eyes in the top third
- keep product centered when doing demos
This tiny thing makes your videos look 20% more “intentional” with zero extra effort.
The Cheap Home UGC Setup (Copy This in 10 Minutes)
You don’t need a studio. You need a setup you can recreate every single time without thinking. The goal is consistency: same look, same sound, same framing, so you can focus on the script and performance.
Here’s the simplest “it just works” setup:
The 4 things you actually need
1) Your phone
Any modern phone is fine. Clean the lens before every shoot (seriously). A fingerprint can ruin an otherwise good video.
2) A tripod (or anything that locks the phone in place)
Shaky handheld makes people scroll. Even if you’re doing “natural” UGC, stability reads as higher quality.
3) A light source you control
If you only do one upgrade, do this. A cheap ring light or small LED panel is enough. The point is not “bright,” it’s “consistent.”
4) A mic (optional at first, but huge upgrade)
If your audio is echo-y or far away, it’ll feel low trust. A small lav mic (wired or wireless) is often the best bang-for-buck upgrade.
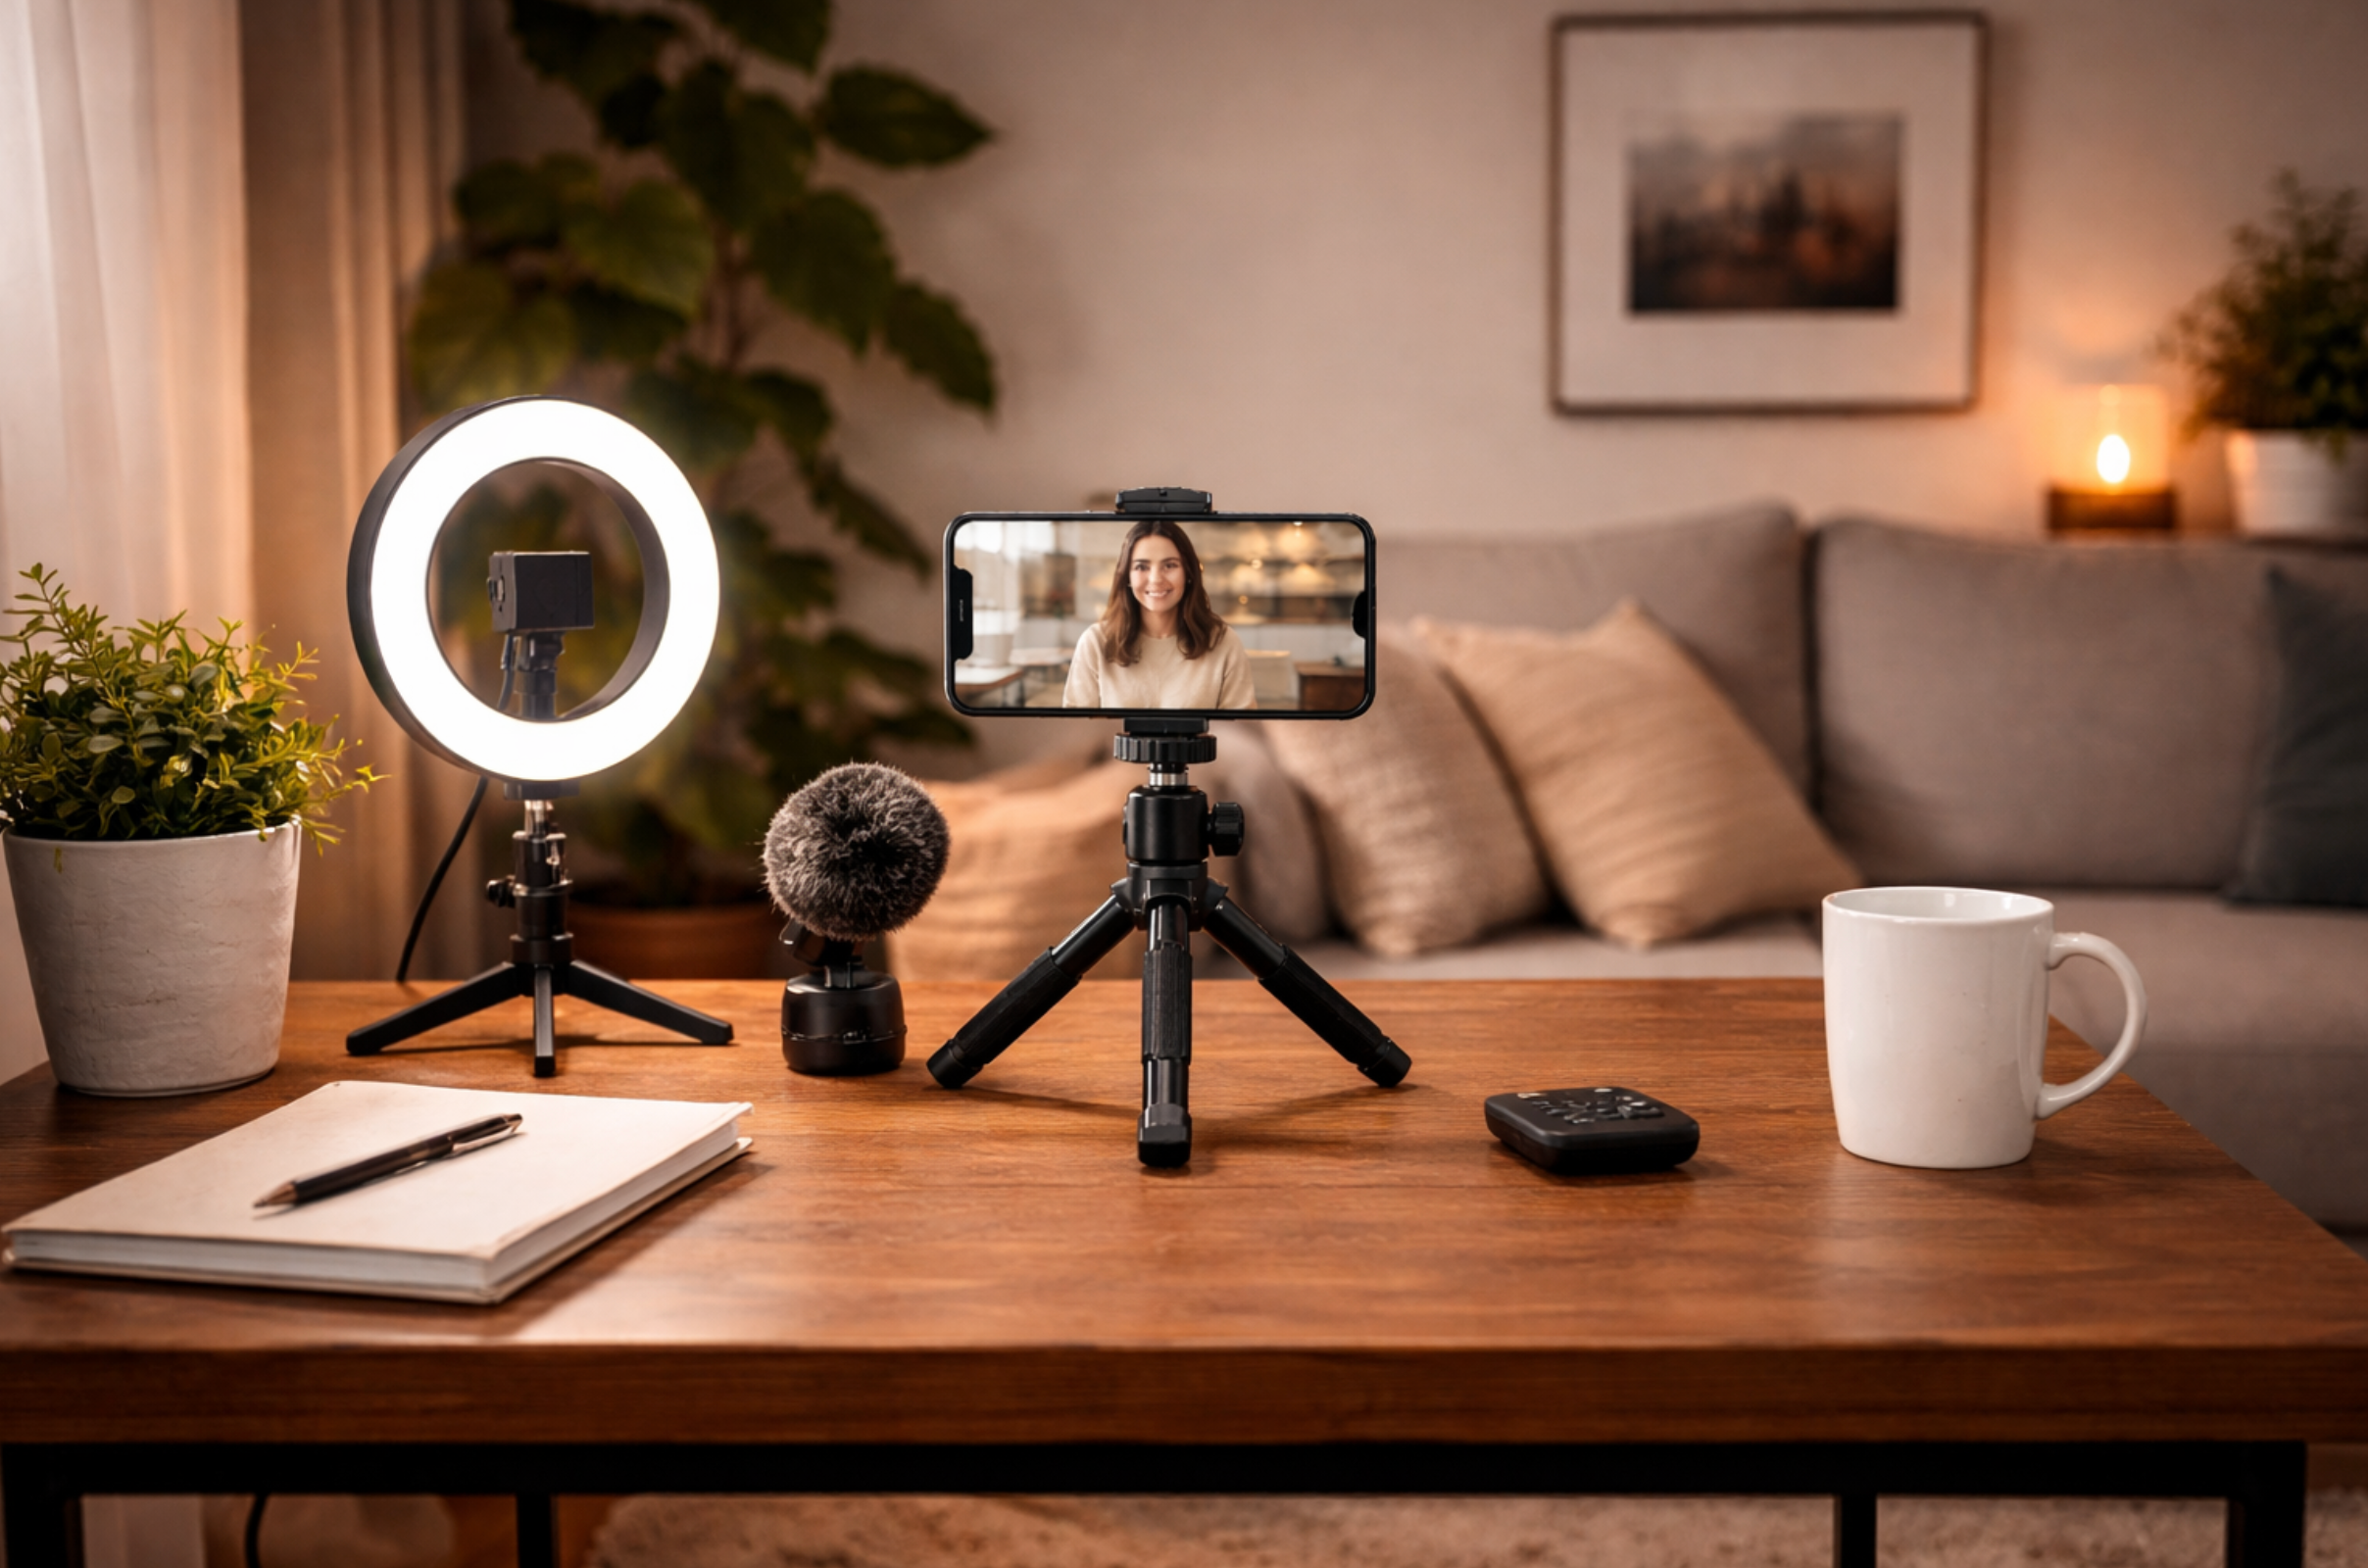
Where to place everything (the easiest layout)
This is the layout that works for most “talking + product” UGC:
- Put the phone at eye level (or slightly above).
- Place the light behind the phone, facing you (not from the side, not behind you).
- Stand or sit about 1–1.5 meters away.
- Keep the background simple, with a little depth.
If you’re using daylight, face a window. Don’t put the window behind you.
Your “one spot” rule (so you don’t reset every time)
Pick one consistent filming spot in your home and treat it like a mini set.
It can be:
- next to a window in the living room
- a clean corner of your bedroom
- a spot near a plain wall + a plant
- your kitchen counter area (as long as it’s not messy)
The rule is: same place, same setup, repeat.
That’s how you film faster and your videos start looking like a “series” instead of random clips.
The 3 default shots you should always capture
Even if your script is simple, these shots cover most UGC needs:
1) A-roll (you talking to camera)
This is your main clip. Keep it clean and confident.
2) Product close-up (hands + product)
Quick shots that show texture, packaging, how it opens, how it looks.
3) Product-in-use (the “moment”)
Applying, unboxing, pouring, clicking, mixing, whatever the core action is.
If you get these three, you can edit almost any UGC ad type.
Settings that make your phone footage look better instantly
Keep it simple:
- Shoot in 1080p (easier to edit and upload, still high quality)
- Use rear camera when possible (better quality)
- Lock exposure/focus if your phone keeps “pulsing”
- Film vertical (9:16) unless the brand asked otherwise
And always do a quick 3-second test clip to check:
- is my face bright enough?
- do I sound clear?
- is the background distracting?
Now, if all these apects, are too complicated, you can always choose to work with creators.
How to Sound Natural on Camera (Even With a Script)
Most “awkward” UGC isn’t a talent problem. It’s a delivery problem. People try to perform a script instead of saying something like a real human who’s excited (or annoyed) enough to share it.
The fix is to build your script like speech, not like copy.
Write it the way you talk
If you wouldn’t say it out loud to a friend, don’t say it on camera.
Instead of: “This revolutionary solution delivers visible results.”
Say: “Okay, I didn’t expect this to work… but it actually did.”
A good UGC line sounds slightly imperfect. Short. Direct. A little opinionated.
Use “bullet memory,” not word-for-word reading
Don’t memorize paragraphs. Memorize beats.
Example beats:
- what annoyed me
- what I tried
- what changed
- what I’d tell someone else
Then you can say it in your own words each take. It’ll instantly feel more real.
The “1 sentence, 1 breath” rule
When you talk fast, you sound nervous. When you talk in long sentences, you sound scripted.
Keep each line short enough to say in one breath. Pause between thoughts. Those pauses are where the video feels natural.
Do 3 quick takes, not 20 perfect takes
A common trap: you keep filming until it sounds “perfect,” and it gets worse.
Do this instead:
- Take 1: loose, casual
- Take 2: a bit more punchy
- Take 3: fastest + most confident
Pick the one that feels the most like you. Not the most “correct.”
Give your face something to do
Stiff face = stiff energy.
Hold the product, pour something, open the package, point to text on screen, show the “before,” scroll your phone, walk two steps into frame. Tiny movement makes you look relaxed.
Make the first line a real thought
The best hooks often sound like an honest reaction, not a sales pitch.
Examples:
- “Wait… why did no one tell me this?”
- “If you’re doing this, stop.”
- “I thought this was a gimmick…”
- “This saved me so much time it’s stupid.”
It sounds like a moment, not an ad.
Conclusion
Home UGC wins because it feels real. But “real” doesn’t mean low effort. The difference between a video that converts and one that flops is almost always the same three things: clean light, clear audio, and framing that makes the viewer feel like they’re in the conversation.
If you set up one repeatable filming spot, keep your phone stable, and deliver your script like you’re talking to a friend (not reading a brief), you’ll instantly look more professional, without buying expensive gear. The goal isn’t perfection. It’s consistency. Once your setup is consistent, you can test more hooks, shoot faster, and improve every week.
Table of contents
- The “Home UGC” Setup Mindset (What You’re Actually Building)
- Lighting First (Because Lighting Makes Everything Look Expensive)
- Audio (The Make-or-Break Part)
- Framing + Angles (So You Look Natural, Not Awkward)
- The “Cheap Setup” Shopping List (3 Budget Tiers)
- Lighting That Looks Expensive (Using One Window + One Light)
- Audio That Doesn’t Sound Like a Bathroom (Cheap Fixes + Mic Tips)
- Framing That Makes You Look Confident (Angles, Distance, Background)
- The Cheap Home UGC Setup (Copy This in 10 Minutes)
- How to Sound Natural on Camera (Even With a Script)
- Conclusion